
October 4, 2012
Lessons Learned: Adopting a Rescue Dog (with apologies)
July 21, 2012
Stretch your Stamps - Day 11 - reverse stamps

Stretch your Stamps - Day 9 - Outline stamps

July 17, 2012
Stretch Your Stamps - Day 7 - Florals

July 14, 2012
Stretch Your Stamps - Day 6 - dies and stamps!

July 12, 2012
Stretch Your Stamps - Day 3 (alphabet stamps)

July 11, 2012
Stretch Your Stamps - Day 2 (Collage stamps)

Funky Tuesday -Not Totally Dyelusion-al


July 9, 2012
Stretch Your Stamps - Day 1 (Background Stamps)
Love online classes and this one is perfect for hot summer afternoons. Learning to use all your stamps 4-5 different ways should get the creative juices flowing!

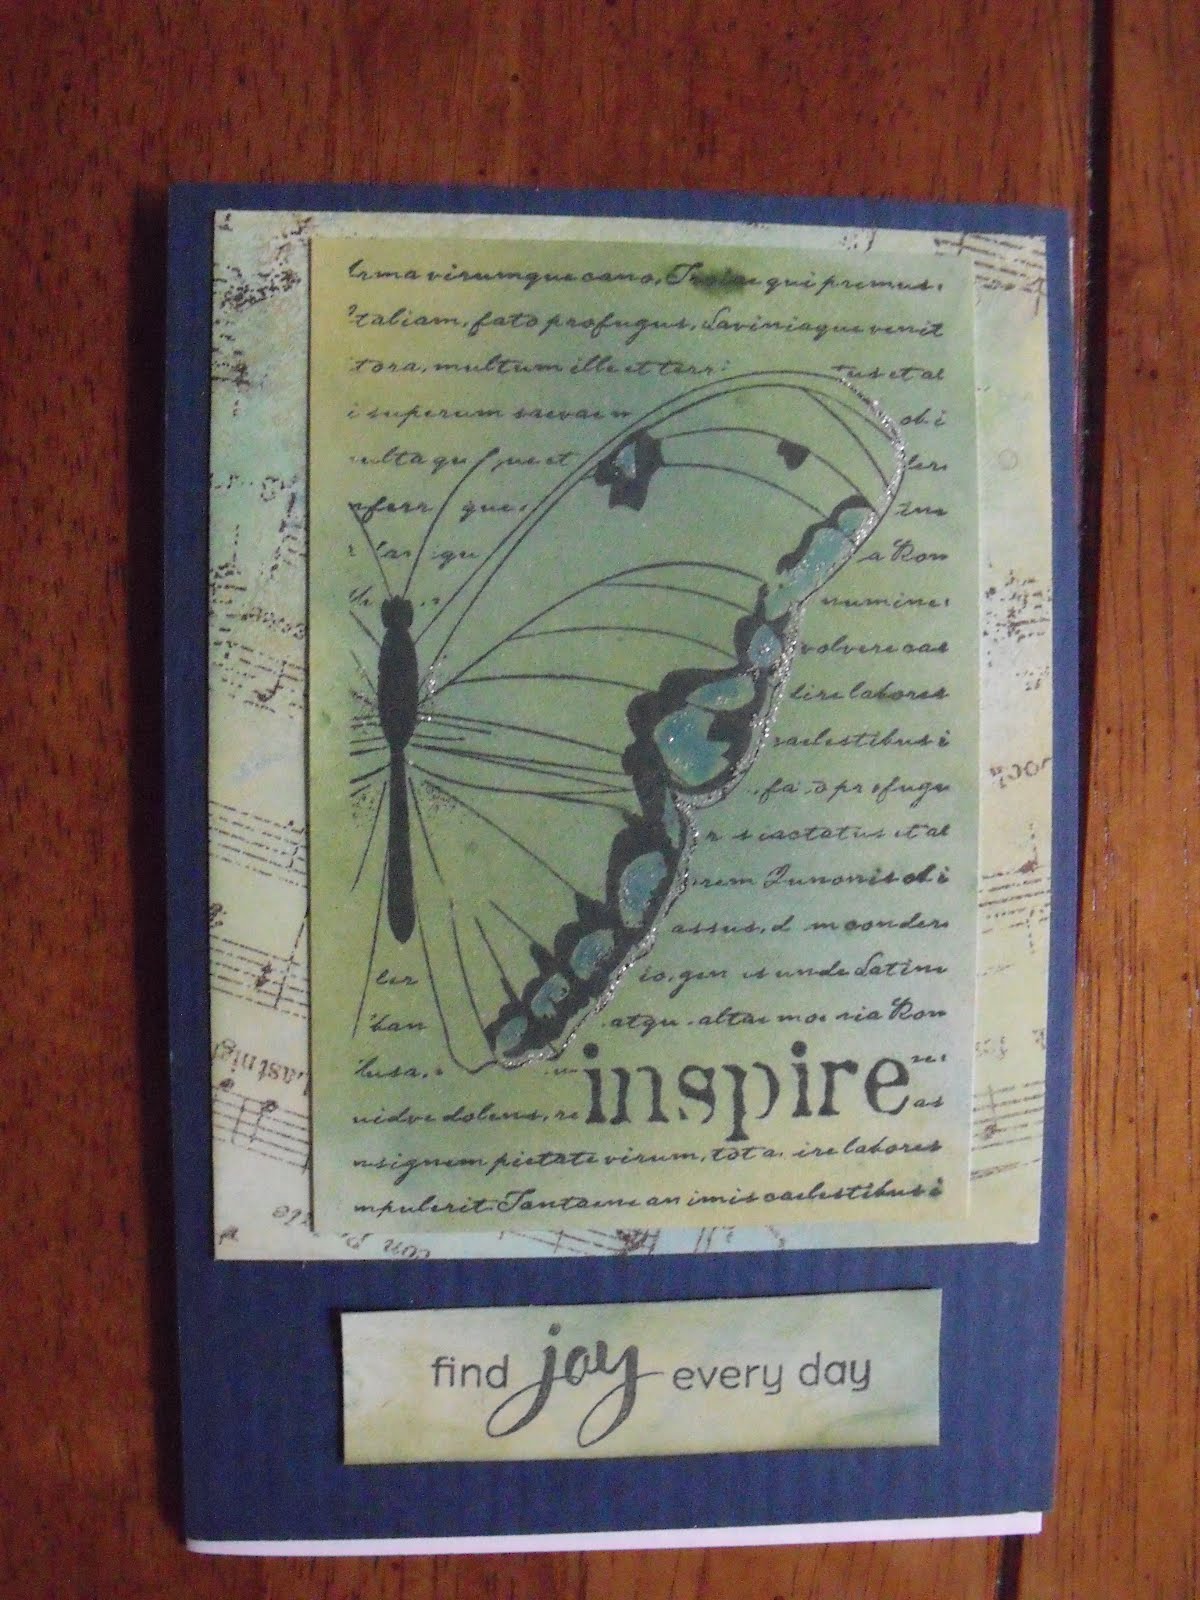
 First day focuses on background stamps. I used Impression Obsession's "Circle Fusion 1" for the background on both. The card background was colored with Stampin Up markers although I want to try making my own multicolor stamp pad later. Paper is Stampin Up Rich Razzleberry, Lucky Limeade, Melon Mambo and Bermuda Bay. Sentiment is from a My Favorite Things set. The other "sample" was done with Tim Holtz Distress Inks on a craft sheet, misted with water and them stamped. Creates a darker image than the colors used (spring, summer).


June 14, 2012
Winged Things Midweek Throwdown
 Holy Cow.. has it been 2 months since I've been here? Yep, it's my blog, looks the same, just needs a little more attention. Midweek challenge on Stars and Stamps this week was good timing since I need Father's Day card for Lacie Jane to give "dad", this would be a cute card for our heros to send home, and I wanted to try some embossing these great Shimmer Sheetz we bought at Peanut Doodles.
Hard to color the doggie to look like Lacie because she's so brindle and my Copics weren't feelin' the brindle love..
Holy Cow.. has it been 2 months since I've been here? Yep, it's my blog, looks the same, just needs a little more attention. Midweek challenge on Stars and Stamps this week was good timing since I need Father's Day card for Lacie Jane to give "dad", this would be a cute card for our heros to send home, and I wanted to try some embossing these great Shimmer Sheetz we bought at Peanut Doodles.
Hard to color the doggie to look like Lacie because she's so brindle and my Copics weren't feelin' the brindle love..
April 8, 2012
Anything Goes at Oozak.com!
March 30, 2012
Creative Chemistry: Days 9 and 10

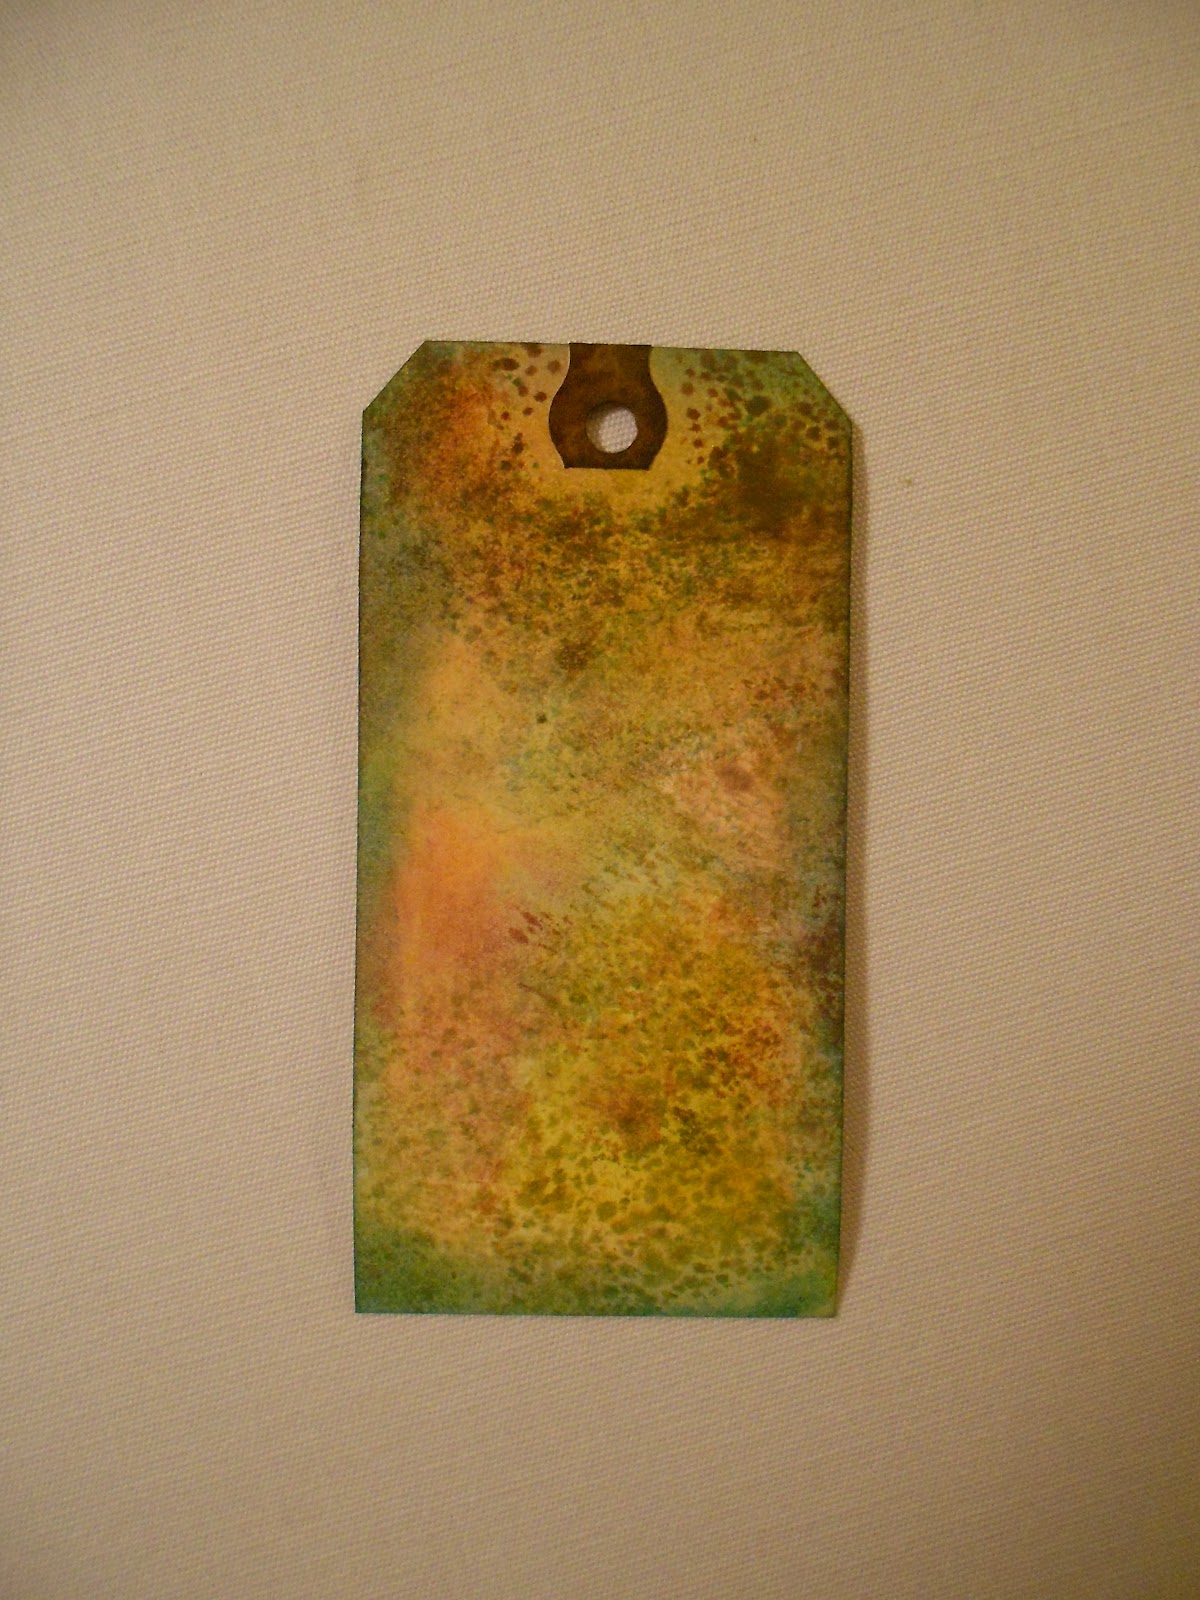
Day 9 - Perfect Pearls - Didn't make my own mist with Perfect Pearls because misting with just water is an art I've not yet mastered in the crafting world (I'll get it on you if you sit next to me), although I do think that painting with the Perfect Pearls powder is pretty cool and gives a neat patina.. just need practice. The tag on the left is various Distress Inks blobbed onto a craft sheet with goops of pearls powder sprinkled on and then misting, running the tag through, misting, running the tag through ad nauseum..."Perfect splatter distress." Nice patina (I guess) but Tim's big "OOOHHHHH" was kinda my big "NAWWW"... Technique No. 1 looked so bizarre when Tim did it and on his sample that I didn't even try. The patina on neither of these shows up well on camera but it is a very metallic, shiny finish that really sets the image off.

Day 10 - Dimensional Mediums had a long lecture and a short project. Basically inking, stamping, heat setting and then wiping through Rock Candy Distress Stickles, spreading the stickles over the image and letting it dry which is a shiny but not "glossy accents" shiny effect. But "someone" didn't heat set enough so a few blurry leaves.. heat set is my new favorite phrase. Again, camera doesn't pick up real effect of the stickles.
Tomorrow he posts the gallery i.e. the Holtz gallery and I can't wait to see what some of this mess turned into and what some of the neat ones turn into There are a couple of techniques for my Alaska scrapbooks in here and a few for cards, some just for fun and, after all, isn't that what crafty days are all about? But I still love my Copics and watercolor crayons best.
March 28, 2012
Creative Chemistry: Day 8 (love it!)
Today was Paint Primer day using distress stains, Adirondack paint daubers, crackle paint and the first thing I should do is go back to Joann.com (huge huge sale till 3/31) and order more colors of stain! Wow.. I loved all of these techniques but two really don't show up well in my photo so I've also included Mr. Holtz' picture.


On my left (and his left) is "distress crackle." The thing with both the crackle paint and the rock candy crackle (his hearts, my buttons) is timing. Because I've played with these before I know it can easily take an hour for these to dry and then aren't really amenable to heat setting. So I peeked at today's samples this afternoon, put on the Scattered Straw crackle and rock candy and let 'em sit for 3 hours... Crackle paint will take distress stains into the "cracks".. you can mist and gently rub over, dry and add more color. Adding color to "non crackled" portion of tag can be with stains or distress inks. The bottom picture shows the "cracked" effect this paint has after it dries and the Scattered Straw has taken the Peeled Paint and Weathered Wood stain into the cracks.
My middle sample and his far right (hearts) is the "shattered stains". The rock candy crackled dries clear so you can just rub the distress stain into it for a stained glass effect, using as much or as little and blotting and drying until you get the desired effect which I did, but it doesn't show up! And I didn't have colors I really waned to use -- Dusty Concord, Tumbled Glass and Pine Needles and maybe some Barn Door as I love the effect on Tim's samples.
My far right and his middle sample is "paint dabber resist" which he did on canvas but I did on Kraft paperand is it quick 'n easy (finally). Using his Adirondack paint dabbers, you "dab" paint onto a stamp, quickly stamp the image (as it is water base but dries waterproof). Then you clean off the stamp with water ASAP - i.e. it dries waterproof, heat set the stamped image, lightly mist tag with water and apply distress stains (walnut and wild honey) onto the tag... the painted image resists the stain, apply as much or as little and heat set... voila!
Tomorrow is perfect pearls powder painting.. have had 'em a year and no idea what to do with them so that will be interesting.
March 27, 2012
Creative Chemistry: Day 7

March 26, 2012
Creative Chemistry: Day 6

March 24, 2012
Creative Chemistry: Day 5

Creative Chemistry 101: Day 4

March 21, 2012
Creative Chemistry 101: Day 3
Today's class included a lecture/demo of various inks and then three techniques: Alcohol Ink Agates, Archival Resist and Stamping with Reflections. One interesting tidbit was to "season" new rubber stamps much like a cast iron skillet: use black archival ink, put on rubber stamp, let dry a minute and then wipe dry. Stamping with light "spun sugar" with this stamp worked despite the black "residue" from the seasoning ink! Another tip: use hand sanitizer if you must use anything but water to clean clear stamps. It's obvious from Tim's demo and just experimenting that clear stamps don't work well with these techniques (see Eiffel Tower!)
 I only had library green archival ink which worked for first tag but you really needed several light shades of archival inks and the archival black for the second. Tim did all stamping with black. Interesting tip: clean stamps with hand sanitizer if you must use anything. He only uses water and a rag. First tag which is done on glossy paper definitely has "card" possibilities and I like the "resist" technique on the right hand tag but not the colors or the way the clear stamp worked.
.JPG)
Third tag he called a "stamping with reflections" technique demonstrated with his Reflections stamps. I just used butterflies and one of his frame textured embossing folders. Stamp the image on inside of emboss folder with archival ink (green again), put tag in and run through the Sizzix. Then highlight the embossing with distress inks bringing color in.. Love this and will definitely play with it although I never understood why he said you had to cut the embossing folder to emboss the tag (not happenin').
Creative Chemistry 101: Day Two

So Day 1 of this online class by Tim Holtz was "lecture" and now starts 10 days in the lab. I'm "into" Tim's style and not into it! Vintage intrigues me and I love the images but some of the techniques just aren't "me".. I don't think! I took this class to inspire me, to learn to use Perfect Pearls and other Ranger stuff in my stash that I've never played with, and for the experience of learning from the master himself. I know it's technically Day 3 already but lots of Operation Write Home cards to sort and ship today so ....
I like the first two tags - first is my favorite and I will use this a lot but I need to work on not getting too much water on the stamp for the floral "distress watercolor" technique and my Pine Needles inkpad did bleed into the Worn Lipstick so headed to forum to see why that happened. The third "drag your tag through the ink" tag took two tries and I still don't love it but there are 9 days left to find things I love.
February 26, 2012
OWH Midweek Throwdown: Mother's Day Cards
OWH has a half and half Mother's Day challenge going... finally time to work on my 10 Mother's Day cards this weekend. Love the Memory Box series of Adore, Inspire, Journey stamps and adapted the Adore one for this card. Colored flowers lots of different colors but I'm just partial to pink and brown...

 ...speaking of which I finally think I captured Lacie's "true colors".. I know, enough about the dog but I was sneaky - sorry ...


February 18, 2012
Tim Holtz Play Day: It's Not "Heavy Metal" But It's Funky!
My friend Daphne is one of the most talented people I know! Her cards and Copic work are just beautiful but teaching is her real calling artistially. Today's technique class today focused not on Tim Holtz' "2011 tags of christmas" specifically, but rather the techniques he used to create them. Several of the techniques will show up as card ideas and mini-tutorials here but this one is particularly cool -- especially since I really didn't think I'd like the finished product at all...

How'd they do that?
After running Quik Kutz metal paper through the Cuttlebug using this "wordy" birthday embossing folder, we mounted it on a manila tag (always best as a first step when working with "wet" ink/pain etc. on cardstock or other medium). Used Ranger daubers to "color" each section of the design and set aside to dry -- this takes a good 45 minutes. Once the paint is completely dry we sanded the entire tag to highlight the words, pop dotted on a happy birthday message, tied with starry green tinsel and voila! Easy, easy and you can do something else while all these dry.
Definitely getting some of this metal paper to experiment with for some funky kids cards and lots of ideas come to mind for Christmas or fall/Halloween motifs. The metal paper comes in packs of twelve 4x12 sheets for about $5.
Two play days are over ... back to the OWH shipper den....
February 11, 2012
ODBD Challenge: Ribbon
VCMP, OBDB... now I know my ABC's... here's another challenge card from me... using RIBBON! I think I'm gonna be #31? Let's do this, ladies!


VCMP CHALLENGE #10: Vintage (yeah!)

Vintage Valentine for my hubby perfect for challenge #10.. I'm not seriously "into" vintage but sometimes just love the look of Kraft paper and deep colors. Roses colored with Copic R39,56 and then shading outlined with black spica.
VCMP Challenge #7: CAS

Clean and simple... found this stamp in a box of donated used stamps and just think it's so great sentiment for a hero card or for a hero to send home - IMHO it just doesn't need anything else. Made 10 of these in red/white/blue and sand and sea colors for my "general" cards that I still really really need.
VCMP CHALLENGE #6: Sand and Sea

Fun card day with a good friend and the dining room table's all cleaned up too! All these challenges looked like so much fun but had to pick.... sooo.....
Blues and tans and snuck some yellow in for the sand on this one! Will make more of these for mom's day challenge I think.
February 7, 2012
VCMP CHALLENGE #2: Hello, Stamp Pad; Hello, Paper Cutter
OWH VCMP CHALLENGE #2: MASCULINE NAUTICAL: A huge handful of M&Ms and a serious case of wanting to be on the OWH cruise making cards with a glass of wine nearby and I dared enter my craft room for the first time this year. 
Masculine theme travel card challenge. Love this Heartfelt stamp and it only took me 3 tries to stamp it clean and twice messing up the watercoloring to decide to go clean. Aquapen will have to wait till Friday. I'm claiming to be a novice again, no it's my shipper duties, no, wait,..new dog...

Masculine theme travel card challenge. Love this Heartfelt stamp and it only took me 3 tries to stamp it clean and twice messing up the watercoloring to decide to go clean. Aquapen will have to wait till Friday. I'm claiming to be a novice again, no it's my shipper duties, no, wait,..new dog...
January 31, 2012
Welcome Lacie Jane!


So hubby's doctor told him to "get a dog" to get us out of the dumps and after we returned from our cruise my obsession with Petfinder.com began! I've always had shelter/rescue doge and I love plotthounds sooooo when I found "Lucy" on North Mecklenburg Animal Rescue's site, we had to meet her. We "interviewed" several other candidates -- oddly enough never had a girl before -- Addy, the Visla, was in a shelter and so sweet; Nikki was a foster with a rambunctious personality; Milo the Bichon just needed some love but Lucy (now Lacie Jane)??? Rescued from a kill shelter 10 months ago, she has been in foster care for 6 months and greeted us at her foster mom's door -- within 30 seconds we knew. She has been here 3 days and has used her doggie door from the first hour, sleeps good on our bed all night through and is just the sweetest girl! Tears around the yard chasing her ball with Steve and is learning the neighborhood on her walks! Lacie started work last night as the Executive Assistant in the OWH East Coast shippers den but got no points because she slept on the job!
It's been 3 months since we lost our sweet Rio... we brought Lacie home on that anniversary. Can dogs smile in doggie heaven? If so I think her "brothers" are all happy to see another rescued forever friend in their yard, although Rio is probably counting on me to keep her from dismembering "Quacker Factory Citrus Elephant".
January 5, 2012
One Sheet Wonder Cards
Someone asked about "one sheet wonder" cards on the OWH Facebook page.. I can't find any on here although I swear I posted some but for the curious... here are a few pics... they are simple and can be dressed up with scallops, ribbon, different shapes for embellishments but the key is one sheet of paper and 4-6 folded white cards can go a long way


Subscribe to:
Posts (Atom)